DockerBuild
Docker构建
我们在使用 Docker 引擎时,也经常使用 Docker Build ,可能我们平时只使用一些命令(docker build),但是实际上 Docker Build 不单单只是工具的集合,而是能辅助您构建工作流(workflow tasks)和提供更多复杂、高级的场景。
- 打包您的软件:构建和打包您的程序,在本地或者云上运行;
- 多阶段构建:使您的镜像足够小和安全;
- 多平台镜像:构建、推送、拉取镜像,在不同的(操作)系统架构上流畅运行;
- 云构建:利用云平台进行镜像构建; (等等以上)
架构
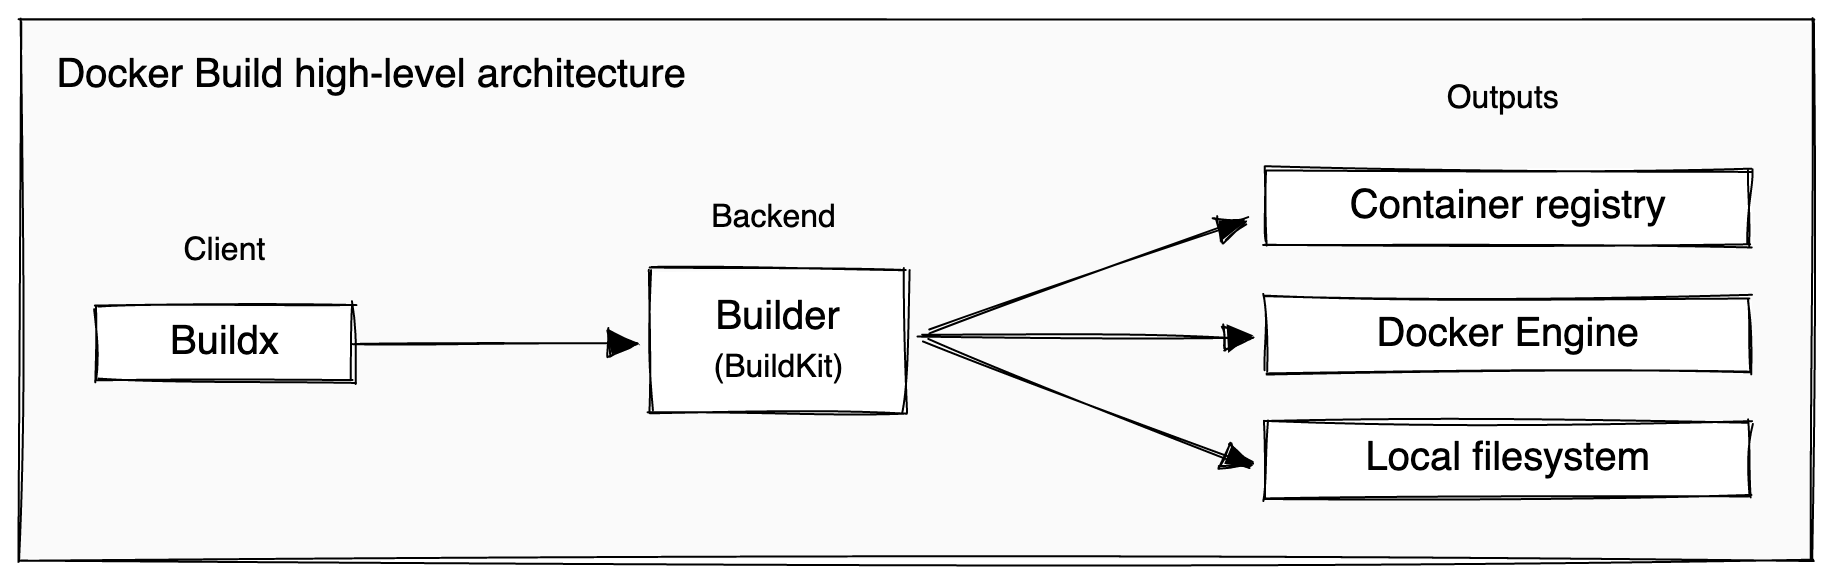
我们可以查看上面的架构图,Docker Build 是 Client-Server 架构,其中 Buildx 是客户端工具,包含命令集合,BuildKit 在服务端进行命令响应。
Docker 镜像
DockerFile
我们可以把DockerFile理解为制作镜像的模版,模板描述成怎样,镜像就制作成怎样。DockerFile是一个文本文件,里面包含制作镜像的内容,所以掌握基础的DockerFile的写法至关重要。
以下是最常用的语法结构:
| 语法 | 描述 |
|---|---|
FROM <image> | 定义一个镜像的基础,通常是小型操作系统,如 debian |
RUN <command> | 在当前镜像层之上执行任何命令 |
WORKDIR <directory> | 工作目录,可以紧跟着RUN,CMD,ENTRYPOINT,COPY,ADD ,也就是这些命令将要操作的目录 |
COPY <src> <dest> | 复制文件或者目录 src 到运行容器 dest 路径中 |
CMD <command> | 定义一个脚本,可以在容器启动时执行一次。每个DockerFile只能有一个 CMD 命令,如果存在多个,则最后一个生效 |
filename
一般来说,我们使用默认名称 DockerFile(没有扩展名) 来新建 DockerFile 文件,如果需要自定义名字,建议使用 somethine.DockerFile 来命名,同时在构建docker build时加入参数--file 指定 DockerFile 的名称。
Docker 构建示例
一个简单的 python web 服务
先来看一段简单的python程序: hello.py
from flask import Flask
app = Flask(__name__)

@app.route("/")
def hello():
    return "Hello World!"
我们希望以上程序能在Docker容器中运行起来,少不了制作一个基础镜像,那么我们先来制作一个Dockerfile(制作镜像的模板): Dockerfile
# syntax=docker/dockerfile:1
FROM ubuntu:22.04

# install app dependencies
RUN apt-get update && apt-get install -y python3 python3-pip
RUN pip install flask==3.0.*

# install app
COPY hello.py /

# final configuration
ENV FLASK_APP=hello
EXPOSE 8000
CMD ["flask", "run", "--host", "0.0.0.0", "--port", "8000"]
网络延迟
由于国内访问官方的docker镜像地址存在很大延迟情况,所以我们需要通过一些加速的办法来提升拉取镜像的速度
- 加入镜像地址
修改docker配置文件
vi /etc/docker/deamon.json加入以下配置:
{
    "registry-mirrors":["https://xxxxxx.mirror.aliyuncs.com", "https://hub-mirror.c.163.com", "https://registry.aliyuncs.com", "https://docker.mirrors.ustc.edu.cn"]
}
以上加入了个人的镜像地址,阿里云、网易等镜像加速地址。
- 修改配置需要重启docker服务:
service docker restart拉取镜像问题-时间校对
 => ERROR [2/4] RUN apt-get update && apt-get install -y python3 python3-pip                                                                                171.0s
------
 > [2/4] RUN apt-get update && apt-get install -y python3 python3-pip:
0.837 Get:1 http://ports.ubuntu.com/ubuntu-ports jammy InRelease [270 kB]
3.272 Get:2 http://ports.ubuntu.com/ubuntu-ports jammy-updates InRelease [128 kB]
5.163 Get:3 http://ports.ubuntu.com/ubuntu-ports jammy-backports InRelease [127 kB]
6.345 Get:4 http://ports.ubuntu.com/ubuntu-ports jammy-security InRelease [129 kB]
7.407 Get:5 http://ports.ubuntu.com/ubuntu-ports jammy/multiverse arm64 Packages [224 kB]
9.014 Get:6 http://ports.ubuntu.com/ubuntu-ports jammy/universe arm64 Packages [17.2 MB]
154.5 Get:7 http://ports.ubuntu.com/ubuntu-ports jammy/main arm64 Packages [1758 kB]
170.1 Get:8 http://ports.ubuntu.com/ubuntu-ports jammy/restricted arm64 Packages [24.2 kB]
170.1 Get:9 http://ports.ubuntu.com/ubuntu-ports jammy-backports/main arm64 Packages [80.6 kB]
170.5 Get:10 http://ports.ubuntu.com/ubuntu-ports jammy-backports/universe arm64 Packages [31.7 kB]
170.6 Reading package lists...
170.9 E: Release file for http://ports.ubuntu.com/ubuntu-ports/dists/jammy-updates/InRelease is not valid yet (invalid for another 3d 13h 22min 2s). Updates for this repository will not be applied.
170.9 E: Release file for http://ports.ubuntu.com/ubuntu-ports/dists/jammy-security/InRelease is not valid yet (invalid for another 3d 13h 20min 39s). Updates for this repository will not be applied.
------
Dockerfile:5
--------------------
   3 |
   4 |     # install app dependencies
   5 | >>> RUN apt-get update && apt-get install -y python3 python3-pip
   6 |     RUN pip install flask==3.0.*
   7 |
--------------------
ERROR: failed to solve: process "/bin/sh -c apt-get update && apt-get install -y python3 python3-pip" did not complete successfully: exit code: 100
这里之前认为是网络问题,实际情况是笔者自己用了虚拟机,虚拟机内的系统时间没更新,导致拉取软件时,校验时间不正确。解决方式则是对齐虚拟机的时间即可。
Dockerfile内容介绍
我们回顾一下上面 Dockerfile 的内容
# syntax=docker/dockerfile:1
FROM ubuntu:22.04

# install app dependencies
RUN apt-get update && apt-get install -y python3 python3-pip
RUN pip install flask==3.0.*

# install app
COPY hello.py /

# final configuration
ENV FLASK_APP=hello
EXPOSE 8000
CMD ["flask", "run", "--host", "0.0.0.0", "--port", "8000"]
每一个语法的解释可以查看 dockerFile